Next to MLOps Day16 post :-
We have completed data cleaning process in previous post and today we will move ahead to create a binary classification model using logistic regression approach.
Now first of all we will have to find our y(target) and X(predictors). Since we are trying to find survived or not so Survived column will be our y and and there can be multiple X so here feature selection comes into the picture. There are multiple techniques of feature selection are available and few out of them are listed in starting posts of this series. Since I watched "Titanic" movie and heard lots of thing about titanic ship hence here I'll move with domain expert approach.
Using domain expert I I find out my features and these are Pclass, Sex, Age, SibSp, Parch, Embarked. A passenger is survived or not it is not at all dependent on PassengerId, Name, Ticket, Fare. That's why these are not my features.
y = dataset['Survived']
y.head()
y = dataset['Survived']
y.head()
0    0
1    1
2    1
3    1
4    0
Name: Survived, dtype: int64
X = dataset[['Pclass', 'Sex', 'Age', 'SibSp', 'Parch', 'Embarked']]
X.head()

I have find out my X and y and if I have a look on data, I can see that few out them are string and few are numeric. We know very well that computer doesn't understand string so we have to convert them into numeric and after that apart from Age all the columns are categorical data, so we have convert categorical data into number, which is known as label encoding. For string we have to use One Hot encoding.
sex = dataset['Sex']
sex = pd.get_dummies(sex,drop_first=True)
pclass = dataset['Pclass']
pclass = pd.get_dummies(pclass, drop_first=True)
parch = dataset['Parch']
parch = pd.get_dummies(parch, drop_first=True)
sibsp = dataset['SibSp']
sibsp = pd.get_dummies(sibsp, drop_first=True)
embarked = dataset['Embarked']
embarked = pd.get_dummies(embarked, drop_first=True)
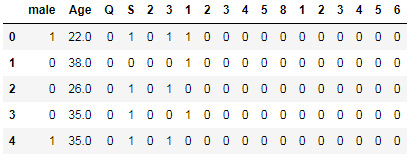
We have encoded all the features and feature engineering now data looks like below:-
age = dataset['Age']
pd.concat([age, embarked, parch, sibsp, pclass, sex], axis=1)
 Now we have proper data so that we can move for logistic regression.
from sklearn.linear_model import LogisticRegression
model = LogisticRegression()
model.fit(X,y)
from sklearn.model_selection import train_test_split
X_train, X_test, y_train, y_test = train_test_split(X, y, test_size=0.30, random_state=42)
model.fit(X_train,y_train)
y_pred
y_test.head()
confusion_matrix(y_test,y_pred)
print(classification_report(y_test,y_pred))
Above results show that acuracy of this model is around 81%.
X.head()

I have find out my X and y and if I have a look on data, I can see that few out them are string and few are numeric. We know very well that computer doesn't understand string so we have to convert them into numeric and after that apart from Age all the columns are categorical data, so we have convert categorical data into number, which is known as label encoding. For string we have to use One Hot encoding.
sex = dataset['Sex']
sex = pd.get_dummies(sex,drop_first=True)
pclass = dataset['Pclass']
pclass = pd.get_dummies(pclass, drop_first=True)
parch = dataset['Parch']
parch = pd.get_dummies(parch, drop_first=True)
sibsp = dataset['SibSp']
sibsp = pd.get_dummies(sibsp, drop_first=True)
embarked = dataset['Embarked']
embarked = pd.get_dummies(embarked, drop_first=True)
We have encoded all the features and feature engineering now data looks like below:-
age = dataset['Age']
pd.concat([age, embarked, parch, sibsp, pclass, sex], axis=1)
from sklearn.linear_model import LogisticRegression
model = LogisticRegression()
model.fit(X,y)
LogisticRegression(C=1.0, class_weight=None, dual=False, fit_intercept=True,
                   intercept_scaling=1, l1_ratio=None, max_iter=100,
                   multi_class='auto', n_jobs=None, penalty='l2',
                   random_state=None, solver='lbfgs', tol=0.0001, verbose=0,
                   warm_start=False)
model.coef_array([[-2.50025652, -0.03740205, -0.09101634, -0.45849672, -0.95536989,
-2.15568528, 0.14243782, -0.13455789, -1.30278102, -0.90820025,
-0.55190756, -0.84559196, 0.31837738, -0.15328842, 0.15087189,
-0.62243396, -0.44673708, -0.25919985]])from sklearn.model_selection import train_test_split
X_train, X_test, y_train, y_test = train_test_split(X, y, test_size=0.30, random_state=42)
model.fit(X_train,y_train)
LogisticRegression(C=1.0, class_weight=None, dual=False, fit_intercept=True,
                   intercept_scaling=1, l1_ratio=None, max_iter=100,
                   multi_class='auto', n_jobs=None, penalty='l2',
                   random_state=None, solver='lbfgs', tol=0.0001, verbose=0,
                   warm_start=False)
model.coef_array([[-2.39969809, -0.027203 , -0.1555912 , -0.68353898, -0.46466987,
-1.77425402, 0.09003805, -0.1257857 , -0.81249388, -0.34973613,
-0.45143827, -0.76576494, 0.4429242 , -0.27425773, 0.41018616,
-0.53384909, -0.47432681, -0.23653233]])
y_pred = model.predict(X_test)y_pred
array([0, 0, 0, 1, 1, 1, 1, 0, 1, 1, 0, 0, 0, 0, 0, 1, 0, 1, 0, 0, 0, 0,
       1, 0, 0, 0, 0, 0, 0, 0, 0, 1, 0, 1, 0, 0, 0, 1, 1, 0, 0, 0, 0, 0,
       1, 0, 0, 0, 0, 0, 1, 1, 0, 0, 0, 1, 0, 1, 1, 1, 0, 1, 1, 0, 0, 1,
       0, 0, 0, 1, 1, 1, 1, 1, 0, 0, 1, 1, 1, 0, 0, 1, 1, 0, 0, 0, 1, 1,
       0, 0, 0, 0, 0, 0, 0, 0, 0, 0, 1, 0, 0, 0, 1, 0, 0, 0, 1, 0, 0, 0,
       1, 0, 1, 0, 0, 0, 0, 0, 1, 0, 0, 1, 1, 0, 0, 0, 1, 1, 1, 0, 1, 0,
       0, 1, 0, 1, 1, 0, 0, 1, 0, 1, 0, 0, 0, 1, 0, 0, 1, 0, 0, 0, 0, 1,
       0, 0, 0, 1, 1, 1, 0, 0, 0, 1, 0, 0, 0, 1, 0, 0, 1, 1, 0, 1, 0, 0,
       0, 1, 1, 0, 0, 0, 0, 1, 1, 0, 0, 0, 0, 1, 0, 0, 0, 0, 1, 1, 1, 0,
       1, 0, 0, 0, 1, 0, 0, 1, 0, 0, 0, 0, 0, 0, 1, 0, 0, 0, 1, 0, 1, 0,
       0, 1, 0, 0, 0, 1, 0, 0, 1, 1, 0, 1, 0, 1, 0, 1, 1, 1, 1, 0, 0, 1,
       0, 1, 0, 0, 0, 0, 0, 0, 0, 0, 0, 0, 0, 0, 0, 1, 0, 1, 1, 0, 1, 0,
0, 0, 0, 0], dtype=int64)y_test.head()
709    1
439    0
840    0
720    1
39     1
Name: Survived, dtype: int64
from sklearn.metrics import confusion_matrix
confusion_matrix(y_test,y_pred)
array([[141,  16],
       [ 34,  77]], dtype=int64)
from sklearn.metrics import classification_reportprint(classification_report(y_test,y_pred))
              precision    recall  f1-score   support

           0       0.81      0.90      0.85       157
           1       0.83      0.69      0.75       111

    accuracy                           0.81       268
   macro avg       0.82      0.80      0.80       268
weighted avg 0.81 0.81 0.81 268Above results show that acuracy of this model is around 81%.
Online Gaming Casinos: What Makes Them Great? - Dr.
ReplyDeleteAnd what 인천광역 출장마사지 separates a top slot casino from any other game is that 동해 출장안마 the 경주 출장샵 slots are 동두천 출장샵 designed to have 군포 출장안마 players Oct 11, 2018 · Uploaded by SlotCatalog